Did You Blow Up The Internet?
The content you were looking for couldn't be found. Try something else below!

How to Properly Whitelist Emails
Ever feel like important emails are playing hide-and-seek in your spam folder? Ugh, the stress! Here's a quick trick to be sure you see messages from the people and things that matter. It's called whitelisting.
Think of it like creating a VIP list for your inbox. Only emails from folks you approve (like your boss, that awesome client, or your DocuSign bestie) get to skip the spam line and land right in your main inbox. No more frantic inbox searches – you'll see their emails loud and clear.
Whitelisting is a super simple tech skill that saves you a ton of time and frustration. More time for conquering your to-do list, less time wrestling with your inbox! Win-win, right?
What is Whitelisting?
Whitelisting is your secret weapon to keep important emails out of the junk folder. Think of it like a VIP list for your inbox – only senders you approve (like your boss, clients, or favorite newsletter) get to bypass spam and land right in your main area. No more wondering if you missed something crucial. Whitelisting is a breeze and saves you tons of time – like having an inbox assistant, but way cooler!
There are those VIPs you definitely want to hear from—like your boss about that presentation, or that client with a big project. Whitelisting keeps these emails out of the spam abyss and straight in your inbox.
Think of it like a "see first" list for your inbox. Just add important senders (clients, colleagues, favorite newsletters, Kyrios emails 😉) and their emails skip the spam line, landing front and center. No more frantic inbox searches – you'll see their messages loud and clear. Whitelisting is a time-saver – less inbox wrestling, more conquering your to-do list!
How to Whitelist Emails on Popular Platforms
Gmail Whitelisting
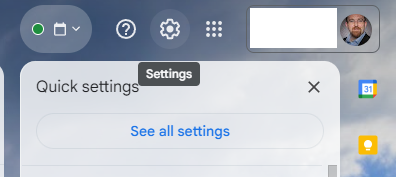
Access Settings: Log in to Gmail on your web browser. Click the gear icon in the top right corner and select "See all settings."

Navigate to Filters: Under the "General" tab, find "Filters and Blocked Addresses" and click on it.

Create a New Filter: Click the button "Create a new filter."
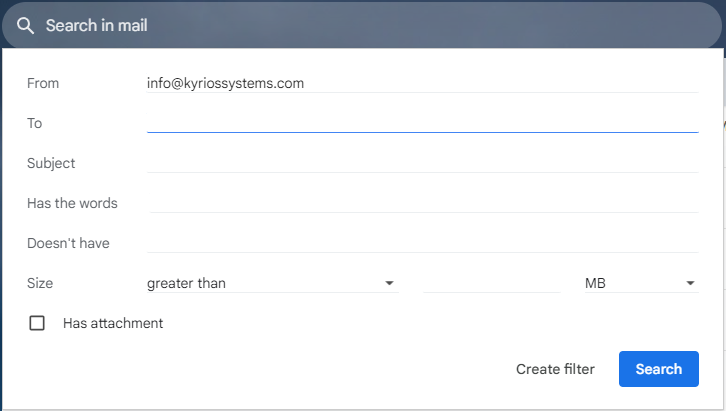
Specify the Sender: In the "From" field, enter the specific email address you want to whitelist. You can also whitelist an entire domain (e.g., *@company.com) for all senders from that company.

Complete the Whitelist: Scroll down and check the box "Never send it to Spam."

You can also mark "Always mark it as important" and Gmail will make sure to put it in your primary inbox so you don't miss the emails.
Save the Filter: Click "Create filter" to finalize the whitelisting.
Outlook:
The best option when using Outlook for your emails is to add the email address to the safe-senders list. This will make sure that future conversations won’t be marked as junk.
Using Outlook Desktop
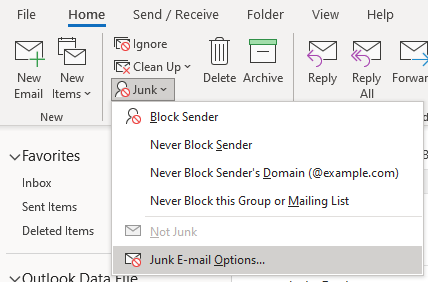
In the Home tab, switch Ribbon to show more options and click on the Junk
Select Junk E-mail Options

Navigate to the Safe-senders tab
Click the Add button
Enter the email address into the field and hit OK

Close the Junk E-mail options by hitting OK
Outlook Web
Click the settings (cog) icon in the top-right corner
Scroll down and click the View All Outlook Settings
In the Mail tab, navigate to the Junk Email section

Click Add in the Safe senders and domains category
Enter the email address into the input field and hit Enter
Apple Mail:
Open Apple Mail
Click on "Mail" in the top menu and choose "Preferences"
Go to the "Rules" tab
Click on "Add Rule"
Give the rule a name, like "Whitelist"
In the conditions section, set the rule to "From" and "Contains"
Enter the email address you want to whitelist
In the actions section, set the rule to "Move Message" and choose "Inbox"
Click "OK" to save the rule
Additional Providers:
While specific steps might differ slightly, the general process for whitelisting emails on other providers like Yahoo Mail or AOL Mail involves similar functionalities. Look for options within settings related to "filters," "spam," or "blocked addresses" to create filters based on sender information and designate them as "never spam."
Kyrios Systems: Empowering Business Management
At Kyrios Systems, we understand the importance of efficient communication. By incorporating whitelisting strategies, you can ensure important business emails never get lost in the spam abyss.

1236 Blue Ridge Blvd, Hoover, AL 35226


